Using eCSSS - Basic Tips
Get the most out of using eCSSS through
these basic tips.
Using Keyboard Shortcuts
Save time by keeping your fingers on the keyboard instead of reaching
for the mouse.
Use <Alt> Key
- If a function contains an underlined letter, press <Alt>
and the underlined letter. For example, to open the Help
Index, press <Alt><H>.

Save - Press
<Alt><S>.
Close -
Press <Alt><C>.
Move to next field
- Press <Tab>
Move to previous
field - Press
<Shift><Tab>
Execute a Function
- Press <Enter>. In
the example below, Add is
the active function.

Press <Enter> to add.
Move between Tabs
- Use <Right> and <Left> arrow keys.
Scroll - Use
<Page Up> and <Page Down> keys.
Navigate in Drop-Down
List - Use <Up>
and <Down> arrow keys
to move up and down the list. Use the <Page
Up> key to go to the first list item and <Page
Down> to go to the last item.
Entering Information
Read-only vs. editable
fields – Read-only fields are boxed with a light grey line.
Editable fields are inset.

Required fields
- Required fields are labeled in red and marked with asterisks. Note
that these fields are required before you can save the document currently
being edited. There may be other fields, such as the Decision
Date of an Eligibility
Determination, that are not initially required for saving
the document, but are required in order to complete and lock a workflow
process.

Dates - Use
MMDDYY format. eCSSS
automatically formats date to include slashes and century. (See
more tips.)
Phone numbers
- Omit parentheses, spaces and dashes. eCSSS automatically formats
phone numbers. Please note:
10-digit
entry formats with area code.
For example, 8081112222
becomes (808) 111-2222.
9-digit
entry formats with 2-digit
work extension. For example,
955000012 becomes 955-0000x12.
7-digit
entry formats with dash.
For example, 9221111 becomes
922-1111.
For number with extensions
other than 2 digits, do either of the following:
Include an x.
For example, 555000x123
becomes 555-0000x123.
Include the area
code. For example, 8085550000123
becomes (808) 555-0000x123.
Check a Checkbox
- <Tab> to the checkbox
and press spacebar.
Select Drop-down
List item - Place the
cursor in the drop-down field and enter the first character of the
entry (a letter or number). For example, if a drop-down menu
for "State" lists all 50 states, press <H> key and
"Hawaii" will appear in the field.
Enter Zip Code Only
- Skip the City and State fields. Once you enter the
ZIP Code, the City
and State fields are filled
in automatically.
Special characters
in eCSSS - Some special characters from other text editors
are not supported in eCSSS, including bullets, ½, ¾., etc. The following
special characters from other text editors are supported in eCSSS:
 (Opening single quote, closing single
quote and apostrophe) shown in eCSSS as '
 (Opening double quote, closing double
quote) shown in eCSSS as "
- (Hyphen) shown in eCSSS as -
 (Dash) shown in eCSSS as --
If you enter an unsupported character into eCSSS (e.g., bullet), the
system will replace it with a different character. TIP: Consider using
dashes instead of bullets when creating lists.
Versioning
For fields with a red checkmark, please be aware of the following:
If you enter information into the field then save
the document, the document is no longer editable. A record of your
document is stored in the Audit Log
with a Locked status.
To edit the document, click New
Version. Provide a short reason for creating a new version
(up to 30 characters). Action Plans
(AP), do not require reasons. Once you click OK,
you cannot edit your reason, which becomes part of the Audit
Log.
After clicking New
Version and entering a reason, you can begin editing a copy of the document.
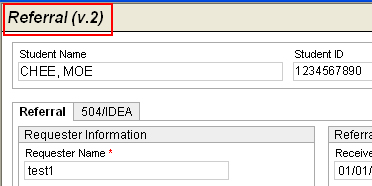
The current version is indicated in the window header
(e.g., v2 is version 2).


In the example above, if you enter a date,
then click Save, the PWN
is no longer editable. However, you are able to edit a copy of the document
as a New Version.
Printing
OK vs. Save
OK temporarily
adds a piece of information to the main record you are working on.
The information is unsaved until you press Save
from the main record.

Save commits
all new information to the main record.

Search
Audit Log
Records
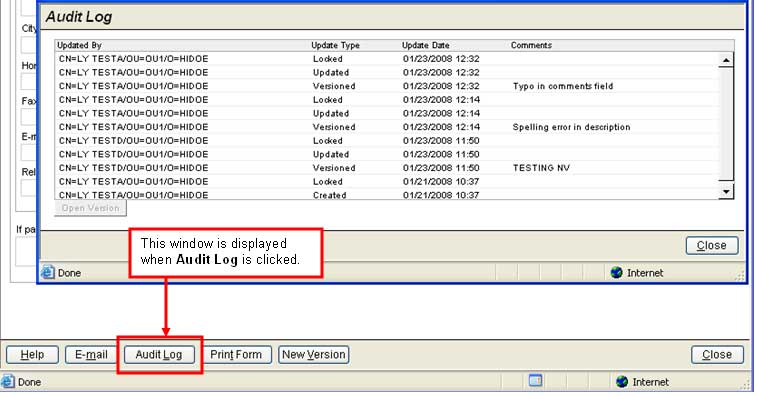
When a document is updated, eCSSS captures the person’s name, update
type, date of modification and reasons for versioning. Click the Audit Log
button at the bottom left of key screens (e.g., - Student
Team, Assessment Report,
etc.).

Legacy Log
Records
When a window contains a Legacy Log
button, this indicates that the referral contains archived information
that has been carried over from ISPED to eCSSS. Click Legacy
Log to view details.
If a Legacy Log button is not displayed, the referral has no previously
archived information from ISPED.

![]()
![]()


