
|
Part II-Roles: DOCUMENT ACTIVATION |
State of hawaii departement of education
electronic Comprehensive Student Support System (eCSSS)
Service Verification Module (SVM)
![]()
The users in this role will be responsible for activating COMPLETED SOP & PP documents as well as authorizing SUBMITTED RFPs.
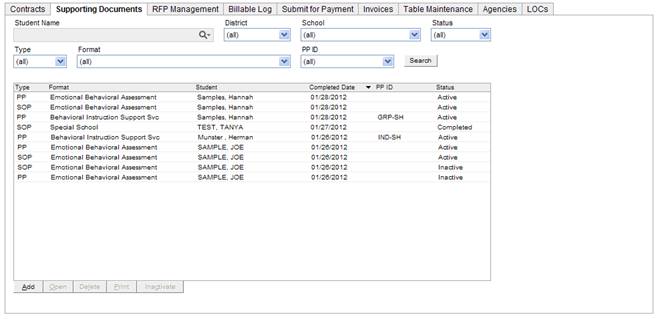
Navigation: Service Mgmt > Supporting Documents tab > Open
Supporting Documents currently include two Types: Standards of Practice (SOP) and Procurement Procedures (PP). These documents are used to support the decision to procure Contracted Services for a Student and indicate which funds will pay for the service. Each document is student specific. The SOP indicates the steps and measures used up to the point of requesting Contracted Services. The PP has an additional tab that will be managed by the DES to indicate the disposition of the Funding decision.
Tasks:
Activate a Standards of Practice (SOP) Supporting Document for a student:
Supporting Document type: Emotional Behavioral Assessment (SOP)
Bring the document to “Active” status
Activate a Procurement Procedures (PP) Supporting Document for a student:
Supporting Document type: Emotional Behavioral Assessment (PP)
Bring the document to “Active” status
Navigational Workflow:
Login to eCSSS with appropriate security rights.
Select Service Mgmt from the eCSSS Home screen:

Select the Supporting Documents tab:

Enter the Student’s last name, first name in the Student Name search field. When the student you are searching for appears in the list, select the student.

Click the Search button.
Select the document to be activated. Click the Open button:
Document will be in “Completed” status
In this example we are using the Emotional Behavioral Assessment (SOP)
Review the document specific information. Optionally, the document may be Rejected.
Select the Activation tab and check the Activated checkbox.

Save and Close the document.
Navigational Workflow:
Login to eCSSS with appropriate security rights.
Select Service Mgmt from the eCSSS Home screen:

Select the RFP Management tab:

Enter the Student’s last name, first name in the Student Name search field. When the student you are searching for appears in the list, select the student.

Click the Search button.
Select the RFP for your student:
In this example, select the RFP with (0103) - LOC 02 – Emotional Behavioral Assessment
Click the Open button. The Request for Provider screen opens.

Select the Authorization tab then, select the Supporting Document to be activated. Click the Open button:
Document will be in “Completed” status
In this example we are using the Emotional Behavioral Assessment (PP)

Review the document specific information.
Select the Supporting Document’s Activation tab.
Select the Program Source and check the Activated checkbox.
In this example we are using the “ASD” Program Source
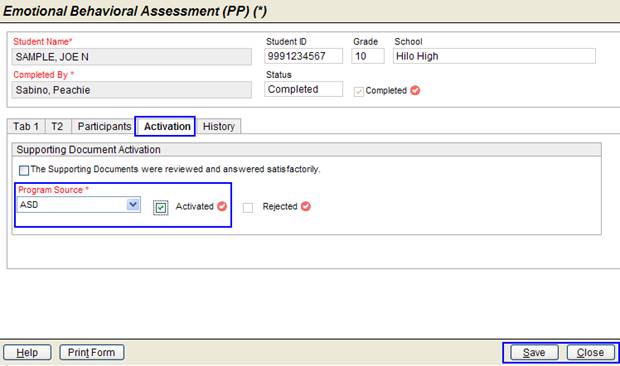
Save and Close the document.
Save and Close the RFP.
Check data entered:
c The Supporting Document on the Request For Provider (RFP) Authorization tab displays the Program Source “ASD” in the Program Source column and “Active” in the Status column.
Activate Request for Provider (RFP)
Navigation: Service Mgmt > RFP Management tab > Open
The Request for Provider (RFP) automates the current paper documentation process to request a contracted service for a student. The filters on the RFP Management tab allow users to easily monitor the status of RFPs and their funding disposition. The user in the DOE Document Creation role will create, modify and cancel the RFP. The user in the DOE Document Activation role will authorize the RFP.

Tasks:
Activate a Request for Provider (RFP) for a student:
Review RFP with LOC 13-Individual Counseling
Review RFP with LOC 02-Emotional Behavioral Assessment
Bring both RFPs to “Active” status
Navigational Workflow:
Login to eCSSS with appropriate security rights.
Select Service Mgmt from the eCSSS Home screen:
Select the RFP Management tab:

Enter the Student’s last name, first name in the Student Name search field. When the student you are searching for appears in the list, select the student.

Click the Search button.
Select the RFP for your student:
In this example, select the RFP with LOC 13 – Individual Counseling
Click the Open button.
Verify that the information entered is correct.
Select the Authorization tab. Check the Authorize checkbox.

Save and Close the RFP.
REPEAT above to bring RFP with LOC 02-Emotional Behavioral Assessment to Active status.
Check data entered:
c The RFP (with LOC 13) that was Authorized displays “Active” in the RFP Management tab Status column.
c The RFP (with LOC 02) that was Authorized displays “Active” in the RFP Management tab Status column.