For DOE: Create an RFP - Two Example Instructions
In the example
instructions below, we walk you through two example scenarios for creating
a Request for Provider (RFP) document. The goal is to create an RFP for
LOC 02 and LOC 13 and bring them to “Submitted” status.
A NOTE ABOUT
ACCESS: This function is available to authorized users only. In
addition, those who have access to this function may not have access to
all fields and buttons mentioned in this document. Please contact the
person who set up your access rights if you have any questions.
Create a Request for Provider
(RFP) - LOC 02
Login to eCSSS with appropriate
security rights.
Select Service Mgmt from
the eCSSS Home screen:

Select the RFP Management
tab:

Click the Add button.
Enter data into the Request for
Provider as follows:
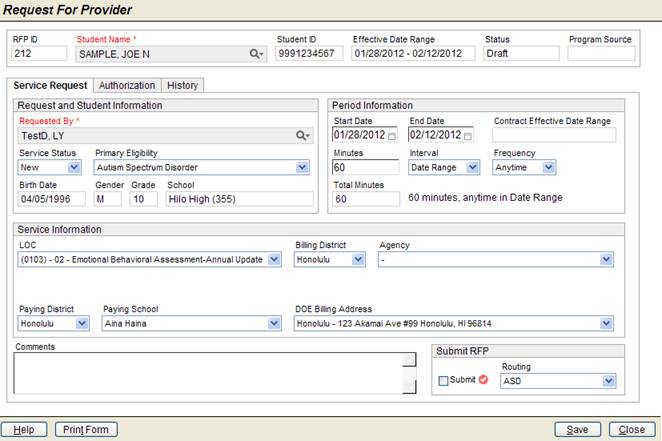
Student
Name: Select Student.
Requested
By: Select any user
Service
Status: Select “New”
Primary
Eligibility: Select any value from the drop-down list
Start
Date: Enter “01/28/2012”
End
Date: Enter “02/02/2012”
Minutes:
Enter “60”
Interval:
Select “Date Range”
Frequency:
Select “Anytime”
LOC:
Select “LOC 02 – Emotional Behavioral Assessment – Annual Update”
Billing
District: Select “Honolulu”
Agency:
Select the Agency you created previously in Part I (“Agency” with
your first initial and last name)
Contract
Type – Package ID: Select the Contract Type – Package ID you created
previously in Part I (“Assessments” with your first initial and
last name)
Billing
Type: Select “All Credential Lvls”
Paying
District: Select “Honolulu”
Paying
School: Select “Aina Haina”
DOE
Billing Address: Select any of the Billing Addresses listed
Submit the RFP:

Routing:
Select “ASD”
Check
the box next to “Submit”
Click
the Save button on the RFP screen
Verify
the Status reflects “Submitted (NP)” *NP =
No Provider
Link Supporting Documents on
the RFP Authorization tab:
Click
the Link PP button, the Link Supporting Documents window
opens:

Select
the Emotional Behavioral Assessment Supporting Document you created
previously.
Click
the OK button to return to the RFP Authorization
tab.
Select
the Emotional Behavioral Assessment Supporting Document you created
previously.
Click
the OK button to return to the RFP Authorization
tab.
Add yourself as a Provider to
the Providers tab:

Select
yourself in the Provider drop-down list
Click
the Add button
Click the Save button
then click the Close button on the Request for Provider screen.
Review the RFP Management
tab:
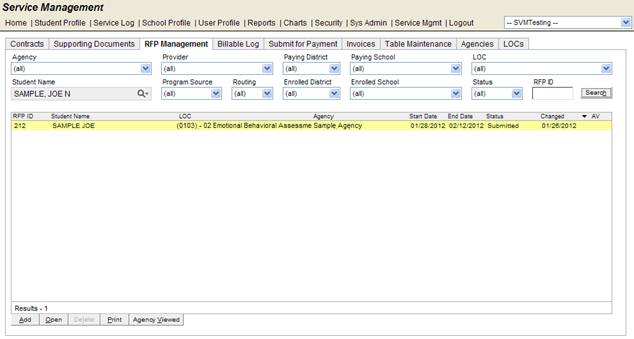
Check
data entered:
c The
RFP you entered is displayed on the RFP Management tab
c The
RFP Status reflects “Submitted”
Create a Request
for Provider (RFP) - LOC 13
Navigational
Workflow:
1. Login
to eCSSS with appropriate security rights.
2. Select
Service Mgmt from the eCSSS Home screen:
3. Select
the RFP Management tab:
4. Click
the Add button.
5. Enter
data into the Request for Provider as follows:
a. Student
Name: Select Student.
b. Requested
By: Select any user
c. Service
Status: Select “New”
d. Primary
Eligibility: Select any value from the drop-down list
e. Start
Date: Enter “01/22/2012”
f. End
Date: Enter “02/04/2012”
g. Minutes:
Enter “90”
h. Interval:
Select “Week”
i. Frequency:
Select “1”
j. LOC:
Select “LOC 13 – Individual Counseling”
k. Billing
District: Select “Honolulu”
l. Agency:
Select the Agency you created previously in Part I (“Agency” with your
first initial and last name)
m. Contract
Type – Package ID: Select the Contract Type – Package ID you created previously
in Part I (“Assessments” with your first initial and last name)
n. Billing
Type: Select “All Credential Lvls”
o. Paying
District: Select “Honolulu”
p. Paying
School: Select “Aina Haina”
q. DOE
Billing Address: Select any of the Billing Addresses listed
6. Submit
the RFP:
a. Routing:
Select “ASD”
b. Check
the box next to “Submit”
c. Click
the Save button on the RFP screen
d. Verify
the Status reflects “Submitted (NP)” *NP = No Provider
7. Link
Supporting Documents on the RFP Authorization tab:
a. Click
the Link PP button, the Link Supporting Documents window opens:
b. Select
the Emotional Behavioral Assessment Supporting Document you created previously.
c. Click
the OK button to return to the RFP Authorization tab.
d.
Select the Emotional Behavioral Assessment Supporting Document
you created previously.
e. Click
the OK button to return to the RFP Authorization tab.
8. Add
yourself as a Provider to the Providers tab:
a. Select
yourself in the Provider drop-down list
b. Click
the Add button
9. Click
the Save button then click the Close button on the Request
for Provider screen.
10. Review the
RFP Management tab:
Check
data entered:
c The
RFP you entered is displayed on the RFP Management tab
c The
RFP Status reflects “Submitted”