Create Revocation of Consent for Continued Services Form
When a student's parent/guardian submits a written statement revoking
consent for continued services,
record it in either the:
- Revocation of Consent for Continued
Provision of SPED and Related Services screen.* For this task
to be completed, the student must (a) have an Eligibility
Determination with a Filed
Date indicating IDEA eligibility and (b) an active IEP.
- Revocation of Consent for Continued
Provision of 504 and Related Services screen.* For this task
to be completed, the student must (a) have an Eligibility
Determination with a Filed
Date indicating 504 eligibility and (b) an active 504 Plan.
This is different from Revocation
of Consent Form 102b, which
applies before a plan is developed. Revocation of continued services applies
after a plan is developed.
IMPORTANT NOTE: In addition
to documenting when the school received this revocation of consent, the
school must also issue a Prior Written
Notice to the parent/guardian to bring this process to closure.
Refer to the FAQs on the eCSSS homepage for a sample PWN
related to revocation of consent for continued provision of SPED/related
services.
* The DOE accepts any written
method parents/guardians may use for the statement. However, if they prefer
the official DOE form, you may provide it to them. Please inquire with
eCSSS Help Desk about printing this form via eCSSS.
For IDEA: More background provided via this page in the eCSSS Knowledgebase (username/password
required).
To complete a Revocation of Consent
for Continued Services Form, do the following:
Search
for a student and select
the appropriate Referral.
Expand DEFINE NEEDS.
Highlight the appropriate Eligibility
Determination document. From the Actions
menu, select New Revocation of Consent
for Continued Services.
The Revocation of
Consent for Continued Services Form is displayed.
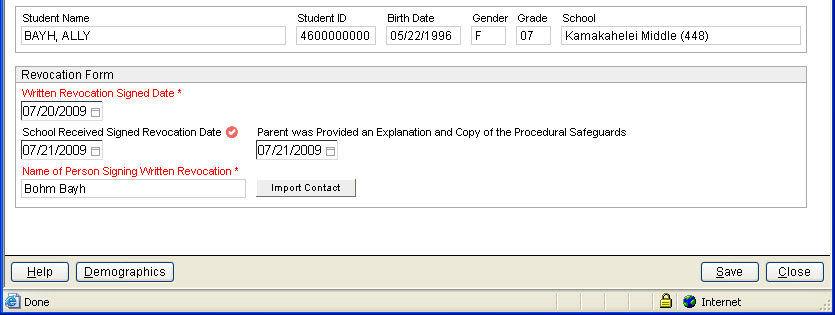
Do the following:
In Written
Revocation Signed Date
field, enter the date the parent/guardian signed a written statement
revoking consent of continued services.
In School Received
Signed Revocation Date field, enter the date the school
received written revocation of consent from parent/guardian. Including
a date in this field will “lock” the revocation document when
saved, but you are able to edit a copy by clicking New
Version (button displays after save).
Enter the date for when Parent
was Provided an Explanation and Copy of the Procedural Safeguards.
For Name of Person
Signing Written Revocation, click Import
Contact. Use the drop-down menu to select the student contact
who signed the revocation. If not on list, add the person as a
parent/guardian on the Contacts tab.
Click Save.
Once the form is saved, the student's eligibility status is automatically
changed to Not Eligible on
the Program
tab.